

System requirements
Adobe After Effects CC 2022 or higher
Windows 10+ or macOS 11+
Basic knowledge of After Effects is recommended
Guess what? The Lite Version is completely free!
Just download Visuprema from our download page to automatically get 14 days of full Pro access with no restrictions. No payment, credit card, or account required.
All your custom presets remain 100% safe. Visuprema will simply switch to the Free Lite Version. You can still use all your created presets and the 50 free built-in assets, but premium features like the advanced layout sizes or the top-10 tag menu will be locked until you upgrade to Pro. Once you purchase the Pro version and enter your license key, you will instantly regain full access to all your custom presets created during the trial period.
No. Visuprema is a one-time purchase. No subscription. Pay once and own the plugin forever.
Because a free version is provided so you can thoroughly test the tool before buying, all sales are final.
Visuprema is an advanced preset manager for Adobe After Effects that changes the way motion designers work with presets: Effects become visible before you apply them, custom presets can be created and saved with an individual animated preview in seconds, and the entire library stays organized at all times — thanks to the built-in VP-Tag-Engine — for an easy and fast workflow without interruptions.
No. Visuprema works alongside After Effects‘ existing preset system. It provides a faster workflow for discovering, creating, organizing, and applying animations.
Your license allows installation on 2 computers.
Updates are delivered through the marketplace. You will be able to download the latest supported version whenever an update is released.
There are two different types of presets:
Type 1: Folder Presets (Static)
These presets are managed in folders and are accessed directly via your hard drive and the extension path. You can reorganize and rename these folders and presets directly in Finder (Mac) or Explorer (Windows). Upon restart, Visuprema automatically refreshes the folder menu display. Folder presets can be marked as favorites and professionally tagged.
Type 2: My Effects Presets (Dynamic)
These are your custom-made presets grouped under “My Effects“. They can be fully modified (Update, Rename, Delete) and represent the core engine of Visuprema.
With Visuprema you create your presets complete with an animated thumbnail preview. The preset name is displayed directly beneath the thumbnail.
You can use the “show/hide tags” button in the function bar to toggle the visibility of assigned tags on or off.
Options Menu: Hovering over a preset thumbnail reveals context icons used to edit the asset (“Update, Rename, Delete“), assign tags, or mark it as a favorite. If your layout view is set to a smaller size, these functions are neatly compressed into a single “More Options“ icon (three-dots).
📍 Note: Only your custom-made presets (“My Effects“) can be edited or modified.
1. Download the ZXP installer: Since Visuprema is a professional CEP extension, download a free ZXP installer like the aescripts + aeplugins ZXP Installer or Anastasiy’s Extension Manager.
2. Install the plugin: Open the ZXP installer and drag-and-drop the visuprema.zxp file into the window.
3. Enable Scripts in After Effects: Open Adobe After Effects. Go to Edit > Preferences > Scripting & Expressions and check the box for „Allow Scripts to Write Files and Access Network“.
4. Open the Extension: Go to the top menu, navigate to Window > Extensions, and select Visuprema. The panel will instantly open in your workspace.
You can find your Visuprema Pro license key in two places right after your purchase:
1. Order Confirmation Email: Check the inbox of the email address you used during checkout. Your unique license key is included directly in the confirmation email.
2. Your Platform Account: Log into the account of the marketplace where you purchased the plugin (e.g., aescripts.com under My Downloads & Licenses). Simply copy the key and paste it into the activation field inside the Visuprema panel to unlock all Pro features.
At the very top of the Settings menu.
To uninstall the panel, delete the extension folder from Adobe’s extensions directory.
Path: Settings > Information & Support > Uninstall > Open extensions folder…
Oder deinstalliere über ein zxp-instllation tool wie anastasy oder xy
Hinweis: achte darauf, dass zur vollständigen Löschung auch der der Ordner „MyFX“ gelöscht wird. Er befindet sich unter
Documents > Adobe > After – Effects [Year] > User Presets.
Eventuell musst du ihn manuell löschen / in den Papierkorb verschieben.
If the extension is missing from your Window > Extensions menu, try these three steps to fix it:
1. Restart Adobe After Effects:
After Effects must be completely closed during the ZXP installation. Restart it to refresh the UI panels.
2. Check the ZXP Installer Status:
Open your ZXP installer again and ensure that Visuprema is marked as “Enabled“ or “Installed“ for your specific After Effects version.
3. Verify preferences for older AE versions:
If you are running an older After Effects version, go to Preferences > General and ensure that “Load Extensions“ or “Enable CEP Panels“ is checked. For modern versions (CC 2024 and newer), make sure your Creative Cloud app allows third-party extensions.
4. Still no success?
Please read the installation guide included in the download package. You can also find it here. Make sure that you have installed Visuprema exactly as described.
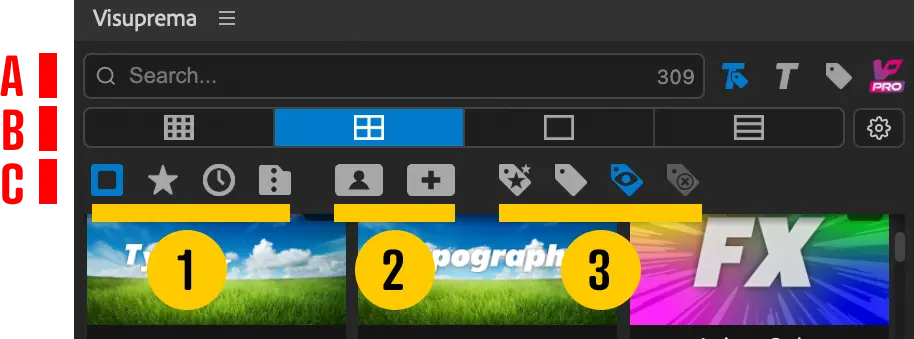
The toolbar provides you with the following features:
A Search Bar
The search bar allows you to search everywhere (names and tags), or narrow it down to search only within names or only within tags.
B Layout Views
Choose between 4 distinct display views: three different responsive grid layouts and one clean list view. The grid layout adapts dynamically to your panel width. If the panel becomes very narrow, the UI automatically switches to „single-column view“.
B Settings Menu
The settings menu offers intuitive options to access advanced functionalities.
C Function Bar
The function bar contains three specialized feature groups:
1 View all, favorites, history, and folders
2 My Effects: View and adding of your custom-made presets
📍 Note: If a layer or object is selected, you can completely remove all its applied effects with a single click using the „Remove effects from layer“ button.
3 Tags: Display your most frequent used tags, the Tag Manager, toggle tag visibility under previews on/off, or use the “clear the search bar“ button instantly when tags are displayed.
Creating custom presets with Visuprema is fast and intuitive:
1. Select your effects: Inside Adobe After Effects, select one or multiple effects and animations in your Effect Controls panel or active composition timeline.
2. Click Create: Open the Visuprema extension panel and click the “+“ (“Create Preset“) button.
3. Name and Tag: Enter a name for your new preset, add your custom tags for fast organization, and choose a category.
4. Save with Preview: Hit “save“. Visuprema instantly generates the animated thumbnail preview and adds your new custom creation directly into your library.
Go to Settings > FFX > Import … Image / Video or Import … Typography.
Select a folder containing preset files (.ffx) on your hard drive.
All files in the folder will be imported. They will appear in the function bar under “My Effects“.
📍 Note: Importing more than roughly 30 files can take several minutes.
There are three fast ways to locate your custom presets inside Visuprema:
1. Click the button “My Effects“ for an overview of your custom presets and use the search bar to refine results.
2. Search by Name or Tags: Type the name of one of your assigned custom tags in the search bar. The library will filter the results in real-time as you type.
📍 Note: The search bar only searches within the selected view, e.g., All Effects, Favorites, or My Effects.
3. Quick-Access Tags: If you enabled tag visibility beneath the thumbnails (button “show/hide tags“), simply click on any tag beneath a preset card to instantly show all other custom assets sharing that same tag.
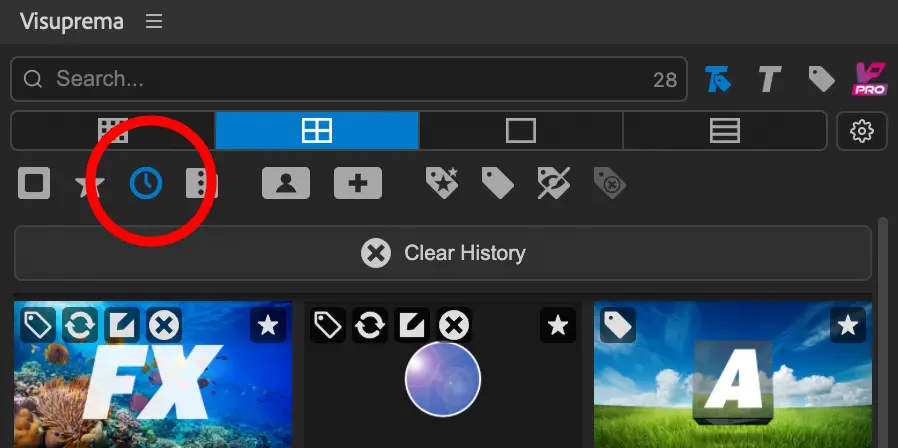
This view tracks all applied presets chronologically including both folder presets and custom presets.
🔺 Attention: The history can only be cleared completely, and the delete button on a thumbnail will permanently delete the preset itself!
Yes. As described under Preset Features, .ffx files can be imported directly into Visuprema via the Settings menu.
🚀 Advanced Tip:
You can also manually copy or move .ffx files directly into the Preset or MyFX folders on your hard drive.
No, it’s much simpler: If the layer or object is selected, all it takes is a single click on the preset thumbnail.
Display configuration: Choose between A-Z or Z-A sorting, adjust font sizes, and switch between Light or Dark themes.
Toggle tooltips on or off to display helpful quick information when hovering over buttons.
Path: Settings > Tooltips > Enabled / Disabled
Toggle animated previews on or off to display either a static image or an animated preview when hovering over presets.
Path: Settings > Hover Animation > Animated / Static
📍 Note:
– Even if the animated preview display is turned off, animations are still generated in the background when you create new presets.
– If you notice that the VP-Library loads slowly or stutters, turning off the hover animations can help, as they may require a significant amount of RAM and loading time.
The “Most Frequent Tags“ menu button displays your top 10 most used tags.
If you have assigned more than 10 tags in total, you can display them in alphabetical order beneath these top 10 tags.
Path: Settings > Tags Display > With all Tags
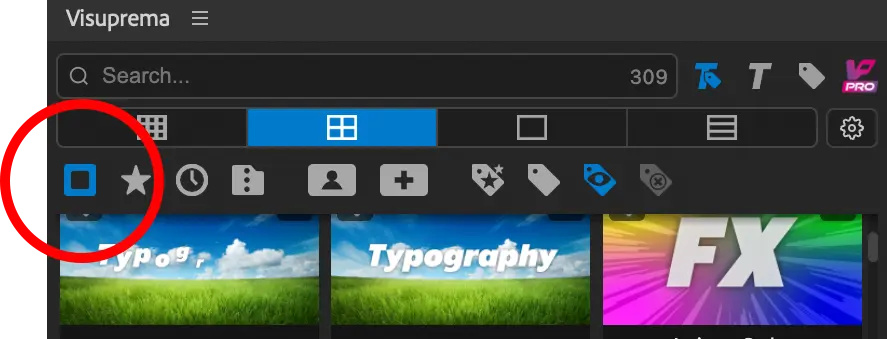
“All Effects“ in the function bar displays ALL presets by default:
A) The pre-installed folder presets organized on your hard drive (which cannot be modified directly).
B) Your custom-made presets, which can also be found in the “My Effects“ view.
You can toggle the visibility of your custom-made presets on or off:
Path: Settings > All Effects > Show with custom / Show without custom
📍 Note: You can always find your custom-made presets in the “My Effects“ menu.
Export and import your settings and tags as a text file in .json format. Please note that image files are not saved in this process.
Path: Settings > FFX > Backup Settings & Tags / Restore Settings & Tags
This path opens the directory on your hard drive where your custom-made presets are saved as .ffx files.
Path: Settings > FFX > Where is my MyFX Folder
Darf nicht verändert, verkauft oder verschenkt werden.
Lorem ipsum dolor sit amet, consetetur sadipscing elitr, sed diam nonumy eirmod tempor invidunt ut labore et dolore magna aliquyam erat, sed diam voluptua. At vero eos et accusam et justo duo dolores et ea rebum. Stet clita kasd gubergren, no sea takimata sanctus est Lorem ipsum dolor sit amet. Lorem ipsum dolor sit amet, consetetur sadipscing elitr, sed diam nonumy eirmod tempor invidunt ut labore et dolore magna aliquyam erat, sed diam voluptua. At vero eos et accusam et justo duo dolores et ea rebum. Stet clita kasd gubergren, no sea takimata sanctus est Lorem ipsum dolor sit amet.
